ROOM 13 How to Survive She
Light discipline, sound control, aborts, and locker timing when the hospital hunts back.
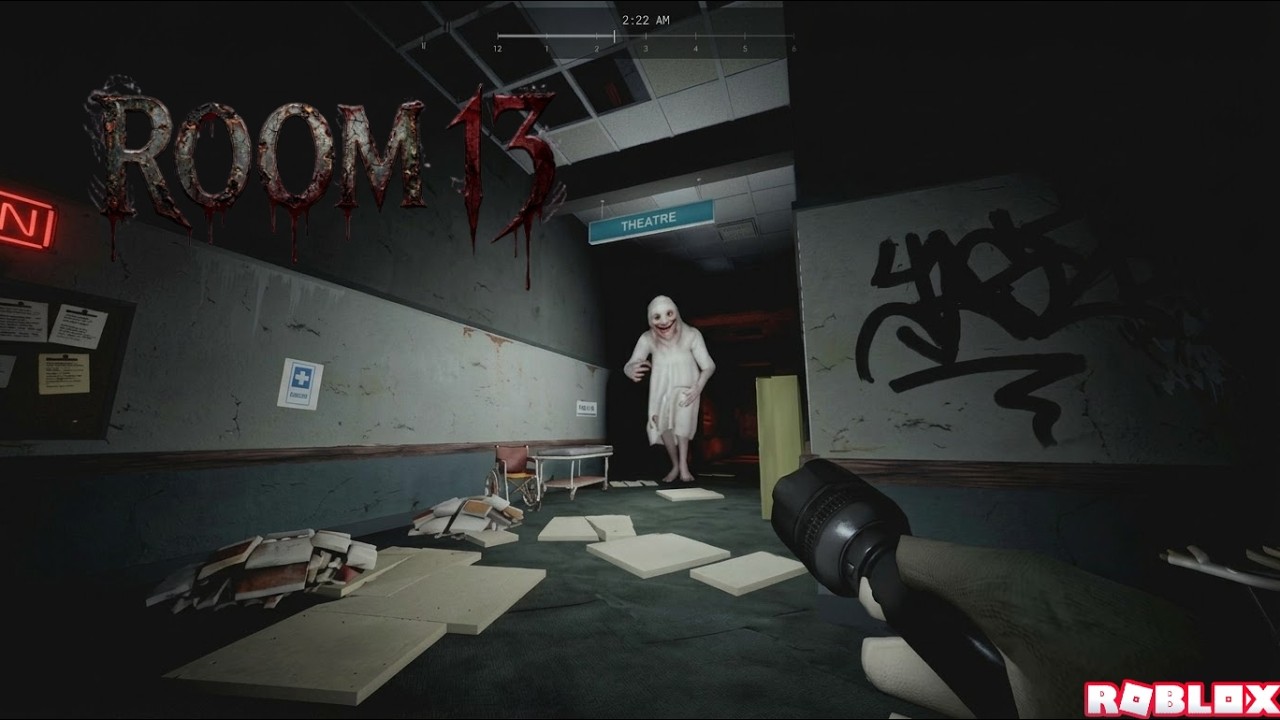
She is the roaming pressure layer in ROOM 13 [HORROR] by CCU Zone. Call bells still end your shift if you miss three, but She is what turns a late door into a wipe when you answer with a lit sprint. She sees flashlight beams and hears running. Surviving her is not a single button—it is a stack of habits: kill the light in open space, walk when unsure, abort compromised routes, hide in lockers and hold breath, then remap before you re-enter her wing. This guide ties those habits to rising night pressure from Quiet through Last Shift.
Read this beside How to Hide for locker detail, How to Answer Bells for the three-strike clock, Map & Generator for Tab/LB routing and power restores, and the Night Walkthrough for named-night pacing.
What She actually detects
Two vectors matter most in public guidance and creator clears: light and running noise. A flashlight left on in a junction paints your silhouette. Continuous sprinting lays a sound trail she can follow. Stack both—beam on, Shift held down a long hall—and you invite the chase. Walking dark through uncertain space is slower on the clock and faster on survival.
She is not an excuse to ignore bells. Players who hide forever still fail when three lamps ring out. Survival means delaying a catch long enough to protect the strike budget, not abandoning the objective.
When to abort a route
Abort the moment your planned hall becomes her hall. Signs include a sudden sighting, audio that places her ahead, or a teammate call that she is on your stair. Stop the hero sprint. Kill the flashlight if it is on. Break line of sight into a side room. If she is close, commit to a locker and hold breath. Only then open the map and pick a door that does not require crossing her current wing.
Turning around is a skill. Many wipes happen because players refuse to waste the seconds they already invested in a bad path. Those seconds are already spent. Paying a few more to live is cheaper than a catch that strands two other lamps.
Community-proven order: survive → remap → clear, never map while grabbed by a chase in the open. Details on safe map timing live on Map & Generator.
Locker plus hold breath under pressure
Lockers are planned tools, not AFK booths. As you clear rooms on Quiet, note two locker rooms on your main loop. When She closes, the nearest locker beats a hopeful dash to a far stair. Enter dark, get inside, hold breath (Space on PC, A on console—see Controls), and wait through the pass. Exit only when the hall feels clear, then remap immediately and resume bells.
Peeking early or slamming out while she is adjacent wastes the hide. In co-op, call your hide so allies do not sprint into the same corridor looking for you with lights on. Full timing drills sit on How to Hide.
Remapping after every forced break
Static speed routes die when She patrols. After every hide or aborted hall, open the map and rebuild the queue: highest-urgency safe lamp first, clusters second if the wing is open, generator restore if power just failed. Solo players must hold that queue in their head. Groups should let a map caller speak one shared queue—role splits are in the Co-op Guide.
Remapping also means accepting detours. A longer safe path that keeps you off her senses still answers the bell. A short loud path that feeds her a catch answers nothing.
Night pressure: Quiet → Last Shift
Quiet — Teaching night. Use it to practice dark walking, short light pulses at panels only, and abort-into-locker drills while bells are still forgiving.
Restless — More overlap. Abort faster; do not finish a scenic loop after you hear her nearby.
Uneasy — Greedy long routes get punished. Shorten every path and keep sound discipline even between lamps.
Hunted — Open long halls become death wishes when she is active. Assume you need hide-first delays before some clears.
Relentless — Leftover Quiet habits (lit wandering, constant sprint, ignored generator) get deleted. Keep aborts strict.
Last Shift — Zero ego. Pre-known locker rooms on every wing, named generator buddy in co-op, and remap after every break. Badge rates near the low single digits exist because stacked lamps plus her pressure leave no spare strikes.
Climb with the Night Walkthrough. If catches—not strikes—are ending your runs, stay on this page and How to Hide until Quiet aborts feel automatic.
Light and sound checklist mid-shift
- Flashlight off in open junctions unless you are reading a door or panel.
- Pulse light at the generator only as long as the interact needs, then kill it.
- Sprint for critical timers and known safe dashes—not as a default gait.
- Stop sprinting as you approach a locker room so footsteps do not drag her to the door.
- After a successful hide, walk the first segment of the new route unless a lamp is about to expire.
Co-op survival calls
Short calls beat essays: “She on my stair—hiding,” “Abort east hall,” “Light off—cluster west.” One player in a locker and another loudly searching for them is a classic wipe. Trust the hide call, clear a safe lamp elsewhere if you can, and regroup after she passes. Assign roles before the night so generator restores do not strand the whole squad in the dark with beams on.
How this page fits the wiki
Use Getting Started for the first-hour plan. Use Tier List and Players for difficulty and badge context after you understand detection. Watch Updates when a new Roblox Updated stamp might change aggression or props. Survive She so the rest of your routing knowledge gets to matter—because the three-strike rule is still watching every red lamp you delay.
Master detection discipline and She stops feeling like a random wipe machine. She becomes a pressure timer you can budget: abort, hide, remap, clear, repeat—from Quiet practice all the way to Last Shift.
Frequently Asked Questions
Quick answers for night-shift survivors.
What does She detect in ROOM 13?
Primarily flashlight light and running noise. Keep the beam off in open halls and sprint only when a timer or safe dash demands it.
When should I abort my current route?
As soon as She occupies your planned hall or closes distance. Break line of sight, hide if needed, then remap to a safer urgent bell.
Does hiding replace answering bells?
No. Hiding buys time so you can still clear lamps. Three missed bells end the shift even if She never catches you.
What is the safest order when She appears?
Survive first (dark, break sight, locker + hold breath if close), then remap, then clear the highest-urgency safe door.
Which night should I use to practice surviving She?
Night 1 Quiet. Drill aborts and locker timing there before Restless and later nights raise density.
Where do I learn locker and breath inputs?
Open How to Hide for locker detail and Controls for Space / A hold-breath bindings on PC and console.